ArDemo - App With AR

Example of making a simple AR application using the Appearition SDK for Unity
Doc v1.3
ArDemo v2.0
Appearition SDK v0.7.1
18th November 2020
Description of Project#
This document explains the process of making an application augmnenting experiences using the technology and method of your choice. This sample projectcomes in with a few packages implemented which might help you; including VuforiaCloud Reco and a Standard Mode.
It will cover how to we implemented the Appearition SDK to work with innovative technologies, and our approach in implementing the ArTargetImageAndMedia module in an Experience workflow.
Requirements#
Before getting started with this sample project, we recommend to check out the tutorials regarding the EMS and SDK, located under Appeariiton/Examples/Turorials.
In order to go through this project, you will need:
-
Unity 2019.4 LTS or newer
-
Intermediate Unity Dev Knowledge
Package Location#
Assets\Appearition\Examples\SampleProjects\AppearitionSDK_vx.x.x-ArDemo_vx.x
1.0 - Setting up the project#
1.1 – Setting up Vuforia#
If you decide to use the Vuforia package, you must go through the following before extracting the ArDemo pacakge. Otherwise, skip to the next section.
If Vuforia (and its version) is included in the ArDemo’s package name, it means that the Vuforia implementation is already extracted in the project. If you wish not to use it, you may go ahead and import the package, and proceed deleting the VuforiaImplementation folder located under Appearition/Example/SampleProjects/ArDemo/Scripts/ArProviders.
First of all, you need the correct version of Vuforia. Open the Package Manager via Window/Package Manager, and look for Vuforia. It’s very likely that the version you are looking for isn’t in the list, and instead see the following:
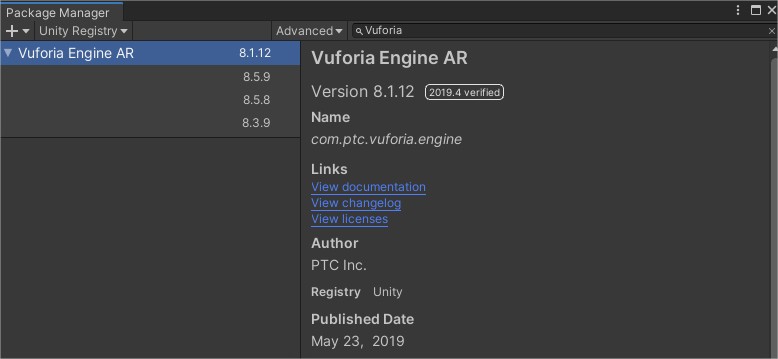
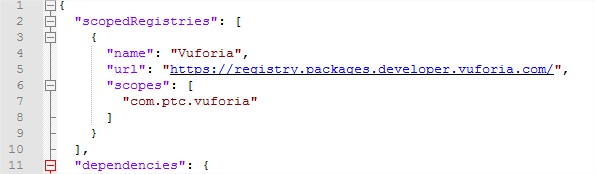
The only way to have access to versions which aren’t over a year old is to update the Package Manifest. Head over to the root of your project, and find manifest.json located inside the Packages folder. We are going to add the following above dependencies:
  "scopedRegistries": [
    {
      "name": "Vuforia",
      "url": "https://registry.packages.developer.vuforia.com/",
      "scopes": [
        "com.ptc.vuforia"
      ]
    }
  ],
After this change, your manifest.json should look like this:
Now, head over back to Unity, and click the Refresh button at the bottom left of the Package Manager screen. It might take a 20-30 seconds to refresh, and you should then see the following:
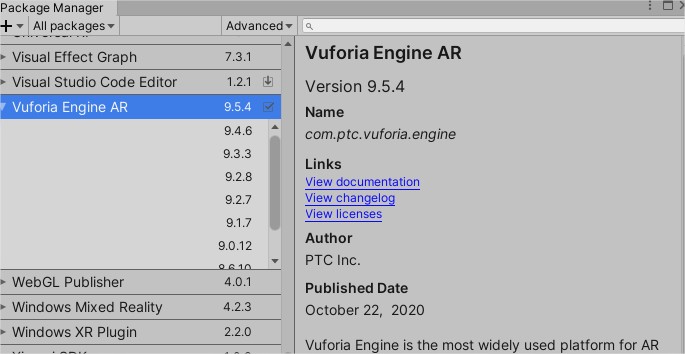
Simply install the package of the indicated version, and then import the ArDemo unitypackage.
1.2 – Test the project#
So you can see what this sample is all about, we’ve pre-configured a channel and the SDK. Head over to the ArDemo_Main scene located under Appearition/Examples/SampleProjects/ArDemo/Scenes.
Since the Sample Project uses target-based AR, we’ve also prepared some targets for you to print in order to test it. You may print them, press play and see what happens upon scanning each.
You will require to have a camera either connected by USB or integrated in your PC. Alternatively, you can make a build of the project using the sample scene instead.
Press play, and once initialized, press on the Toggle Standard Sample to view a non-augmented experience, or Toggle Ar Provider to open Vuforia and its camera. For the latter, aim the camera towards one of the Target Images to view its content.
To switch to another target, simply press the Reset button, and scan another.
2.0 - EMS Content#
If you want to create your own content to augment, this is the section.
2.1 – EMS Content Setup#
After going to the EMS Portal and logging in, you will be facing one of the following cases:
-
Tenant Selection Panel: Select the tenant of your choice to continue. This only applies if you’ve been allocated multiple tenants.
-
Welcome Screen: Featuring many options based on your role. In our case, we want to create content, so click on the centered button labeled “Your Channel List” below the greeting text. Do note that the text may vary.
-
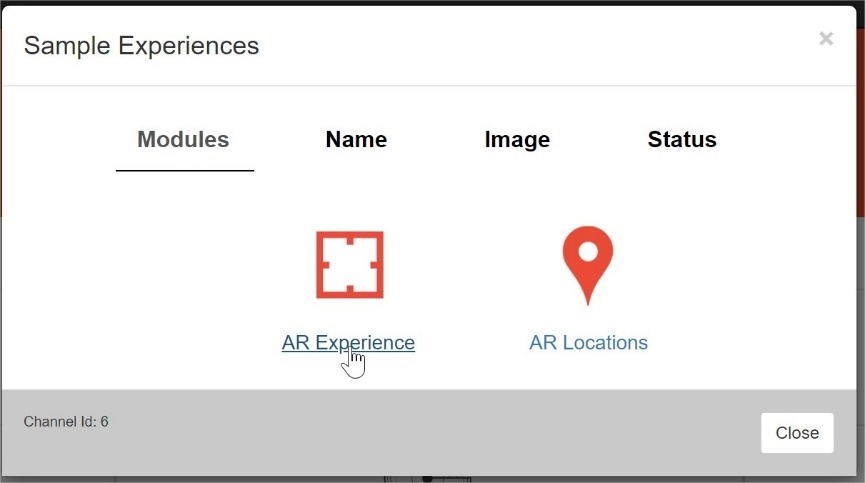
A list of channels: Select the channels of your choice to continue, as shown on the picture below.
-
The AR Experience list: Where you can create all experiences. We’ll get there in a bit, if you have direct access to this option, it’s meant to save you time.
If you are facing the Channel selection panel, click on your channel and then on the Ar Experience module.
You will be redirected to the page listing all the experiences which are part of your channel. To get started, click on the Add AR Experience button.
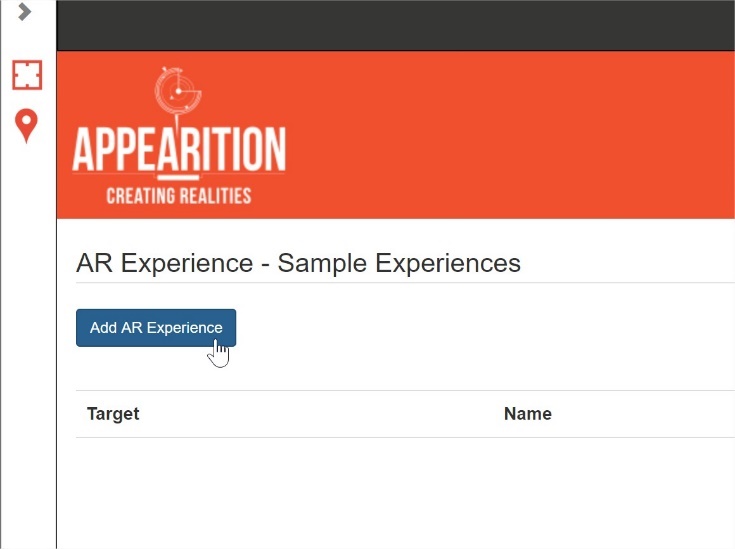
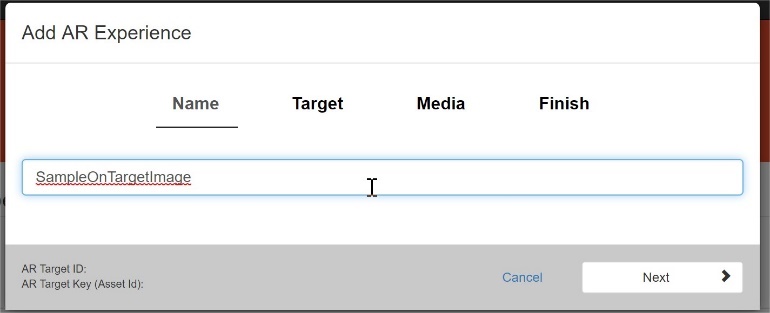
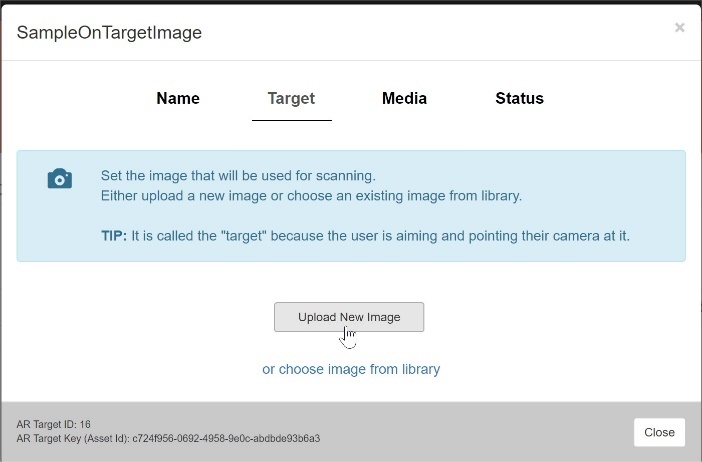
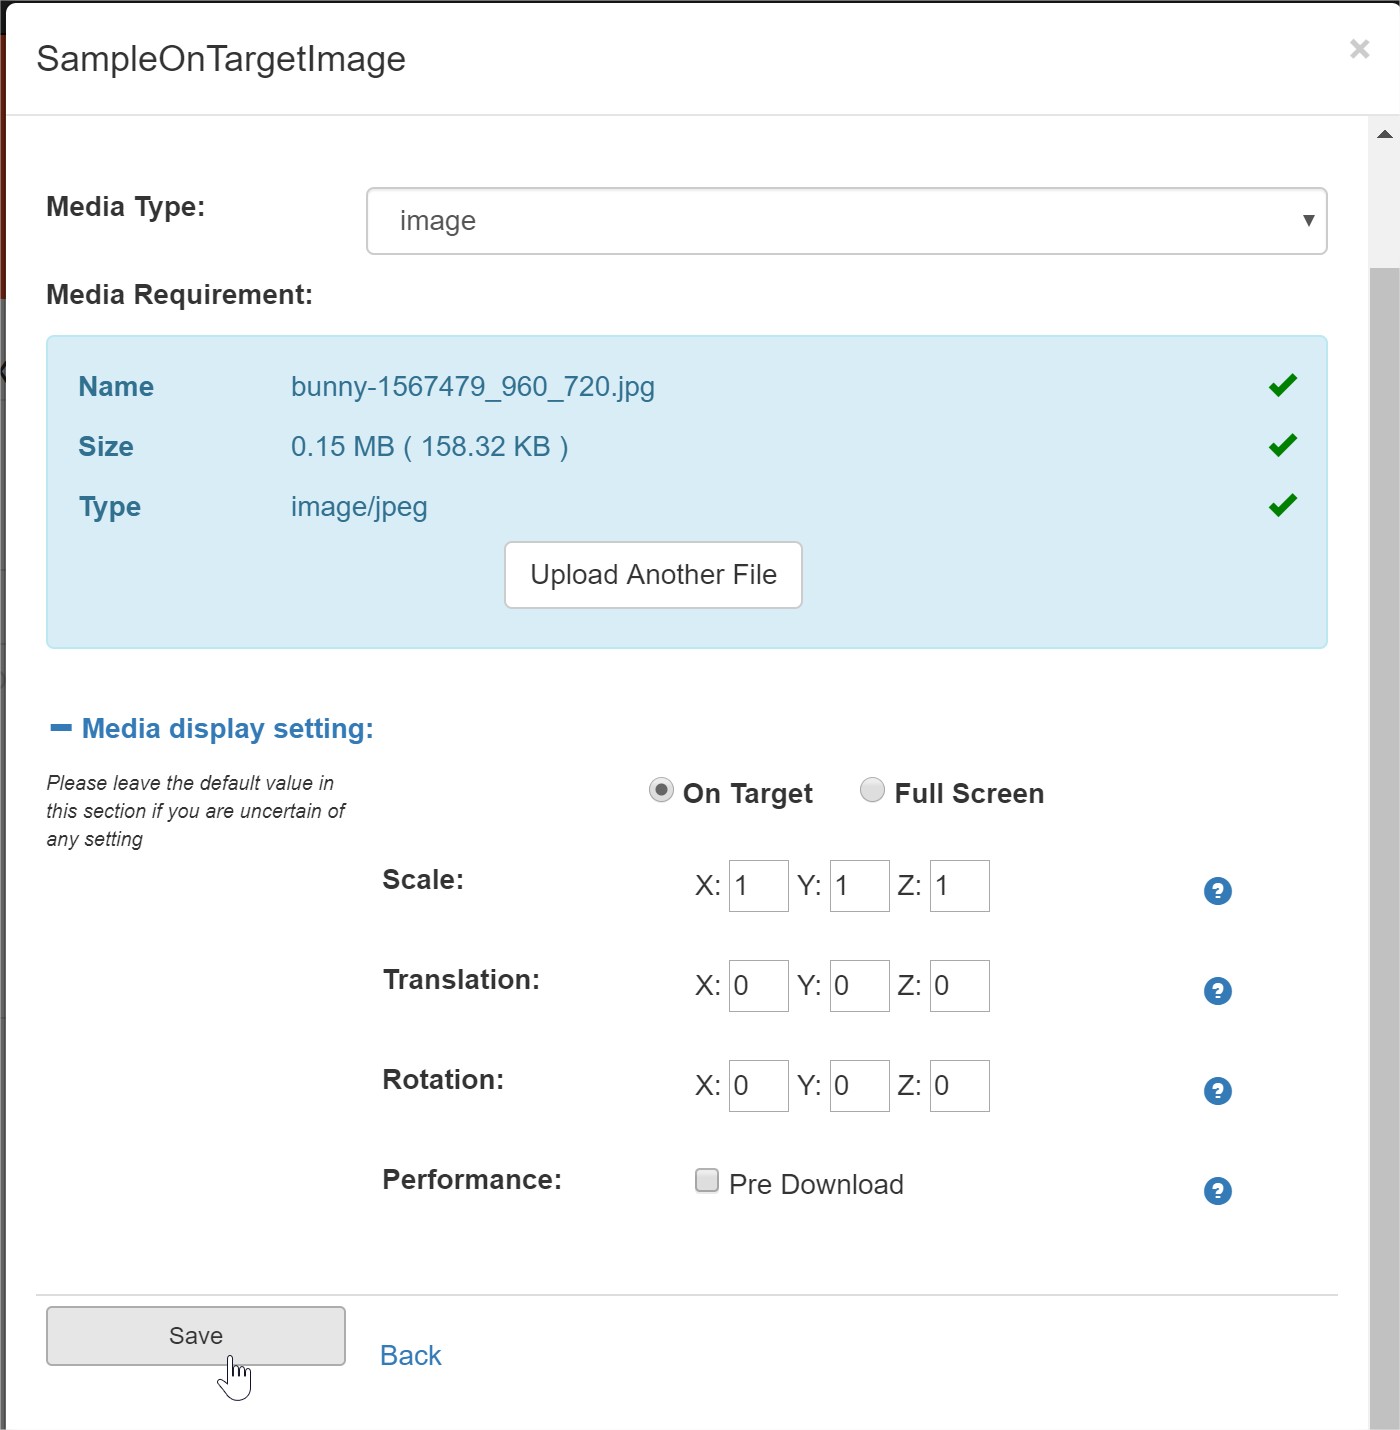
The process to create an AR Experience is the following:
-
Name the Experience.
-
Give the Experience an Ar Target Image, which will be picked up by the Image Recognition in the application when scanning it. Your Medias will be displayed on the top of it.
-
Add Medias to your Experience, as many as you wish. In most cases, we recommend a single Media with a visual (image, video, etc) per Experience, since, unless they are OnTarget and the scale and position of each are adjusted. There are cases where you would want more than one by default, such as Assetbundle for mobile devices, which will be explained later.
-
Publish the Experience.
Note
Do note that it is important to ensure that the Scale is 1,1,1 (or above zero for each value) for OnTarget medias.
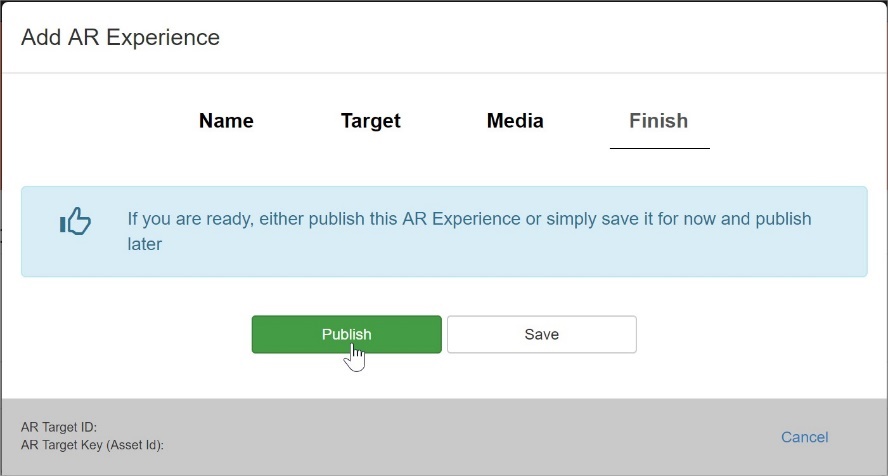
Once published, your Experience should appear normally in the list of Experiences.
3.0 - ArDemo Setup#
The Appearition SDK usually relies on a single prefab to work: The AppearitionManager. In the case of the ArDemo, we’ll be using a slightly modified one, which includes more components related to the ArDemo. It can be found under Appearition>Example>ArDemo>Prefabs, and is called AppearitionManager_Ar.
2.1 – AppearitionGate#
Main component talking with the EMS. Required to be present on any scene where the EMS communication is required.
Note
If you have any doubt on how to achieve this, check the “01-Introduction Tutorial” scene located in Appearition/Examples/Tutorials/01-Introduction.
2.2 - AppearitionArHandler#
This script is responsible for loading, unloading and communicating with ArProviders regardless what technology they use.
Important
Any ArProvider used in this app needs to be dropped inside the provider container.
Any settings to be used across ArProviders and ArMedias are generally set here.
2.3 – Input Handler & Lean Touch#
Used for various input systems, which you’re free to use. In the ArDemo, we’re using it exclusively with the ArExperienceManipulator.
2.4 – ArExperienceManipulator#
Enables manipulation of experiences on demand.
Note
If any of your experiences have the “Interactive” tag, you will be able to manipulate them.
It works as follows:
-
One finger drag: rotate around one axis.
-
Two fingers drag: move the experience around.
-
two finger pinch: scale the experience uniformly.
If you wish to change the magnitude of these transformations or add your own, feel free to edit the exposed variables or edit the script.
2.5 – ArDemoConstants#
Contains a few constants to avoid hardcoding strings around the demo/app.
2.6 - Testing#
You are now ready to test. We usually have three ways of testing AR Content:
-
Print a target on paper and hold it on front of the camera.
-
Use the UnityRemote application to access the phone’s camera and have it aim at the Target Image picture on the computer’s Screen.
-
Build on Android/iOS and aim the camera at either the printed Target Image or the picture on the computer’s screen.
The Target Images should get picked up by Vuforia when scanning your targets, showing your content on the top of them.
3.1 ArProviders & ArMedia#
3.1 – What are they ArProviders#
In this project, the concept of ArProviders refer to some sort of wrapper of a technology which helps indicating the target detection state.
Hence, the main implementations for an ArProvider are:
-
ChangeArProviderActiveState : Whether to activate or deactivate an ArProvider.
-
ChangeScanningState : Whether to allow an ArProvider to look for content or to stop looking for content.
-
ClearTargetsBeingTracked : Dispose of the current data.
We recommend communicating with the ArProviders via the AppearitionArHandler, which is in charge of managing and handling those ArProviders regardless of their type.
For instance, in order to enable an ArProvider after the AppearitionArHandler is initialized, you can use the following code:
    void Awake()
    {
        AppearitionArHandler.OnInitializationComplete += AppearitionArHandler_OnInitializationComplete;
    }

    private void AppearitionArHandler_OnInitializationComplete()
    {
        AppearitionArHandler.ChangeArProvider<VuforiaCloudProviderHandler>();

        AppearitionArHandler.OnInitializationComplete -= AppearitionArHandler_OnInitializationComplete;
    }
3.2 Creating your own ArProvider#
In order to create your own ArHandler, you need to create a new class which inherits from BaseArProvider.
The best example is StandardArProvider, which is the simplest ArProvider possible since it just presents the assets in front of the Unity camera without the intervention of any third party tools.
Do note that there are a few interfaces available for specific types of ArProviders with offline capability, or markerless. The main reason behind this decision is the difference in flow between the two types of user experience, as presented below.

Feel free to explore the VuforiaCloudProviderHandler and StandardArProvider for better understanding.
Important
In order for the ArProvider to be taken in account by the AppearitionArHandler, it needs to be dropped inside the “provider” list on the component.
Finally, ensure your ArProvider is at disabled state before pressing play. If you need to enable your ArProvider when the application starts, consider enabling it right after AppearitionArHandler is done initializing.
3.3 ArExperience & ArMedia#
Once found by an ArProvider, the ArProvider can create an ArExperience object using the asset it just picked up (or was given, if IOfflineMarkerlessArProvider).
The method is AppearitionArHandler.CreateExperienceFromAsset, and its implementation is as follows:
public IEnumerator LoadSelectedExperience(Asset asset)
{
    bool? isSuccess = default;
    ArExperience experience = AppearitionArHandler.CreateExperienceFromAsset(asset, success => isSuccess = success);

    while (!isSuccess.HasValue)
        yield return null;

    //No placing needs to be done either.
    _activeExperiences.Add(experience);
    AppearitionArHandler.ArProviderTargetStateChanged(experience, AppearitionArHandler.TargetState.TargetFound);
    AppearitionArHandler.ArProviderTargetLoaded(isSuccess.Value);
}
Once created, the role of the ArExperience is to be the ViewModel of an Asset (or ArTarget), and the ArMedia to be the ViewModel of the Mediafiles. The ArExperience is a MonoBehavior script, and will be placed under the AppearitionArHandler’s GameObject.
Then, for each MediaFile, it will create a new child GameObject with a MediaHolder script on it, containing the ArMedia.
The ArMedia class is selected using a score system. Most MediaFiles will be found by checking their MediaType string value, but some might be more complex. This system allows a more flexible approach to this problem.
The ArMedia implementation might be more complex than a script and require a prefab (eg VideoArMedia). ArMedia has a field called PathToPrefab, which can be overwritten.
public override string PathToPrefab => $"{ArDemoConstants.ARPREFAB_FOLDER_NAME_IN_RESOURCES}/video";
Note
Feel free to edit the existing ArMedia if they don’t fit your implementation.
3.4 ACreating your own ArMedia#
If your app needs to implement new ArMedia, it’s as simple as created a new class which inherits from BaseArMedia.
You will be required to override GenerateMediaAssociationScore, which is used to determine whether this ArMedia class is right for the MediaFile being checked when setting up an ArExperience. Adding the Constructor taking in MediaFile is also required.
Additionally, you have access to a few methods you can decide to use:
-
Setup: Initialization
-
ChangeDisplayState: Whether the Media needs to be visible or not
-
DownloadAndLoadMedia: Called whenever the Media data should be loaded.
-
Dispose: Required if your ArMedia needs to do some cleanup.
3.0 – Debugging AR Experiences#
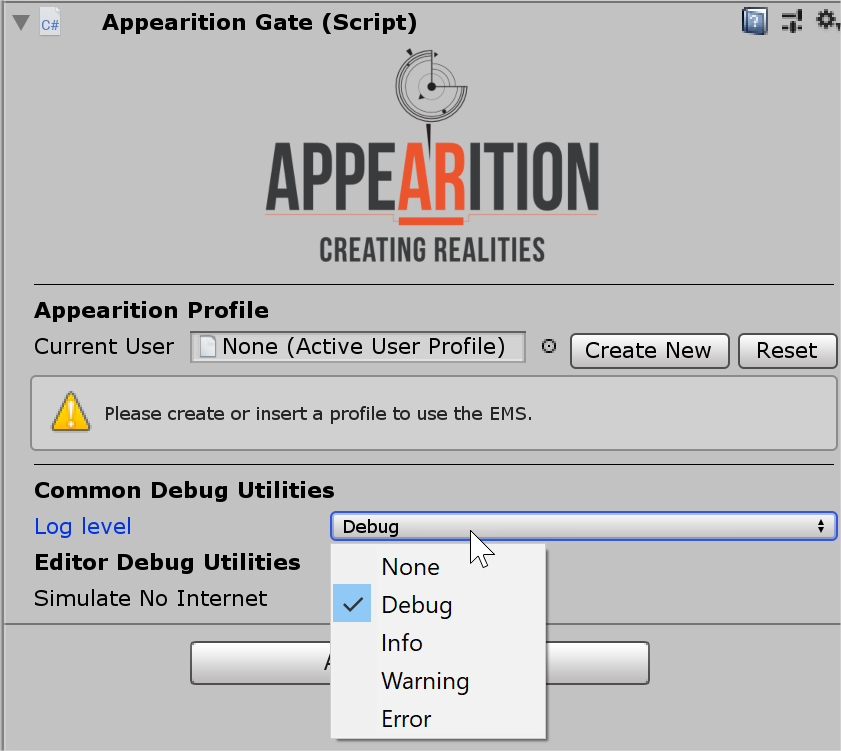
Here are some tips for how to debug the ArDemo. For starters, when developing, changing the Logging Mode to Debug helps a lot, since it won’t filter the Debug.Logs created by the Appearition SDK. We highly recommend setting it to Debug for the sake of visibility.
3.1 – Setup Common Mistakes#
Here is a list of the common mistakes and how to solve them.
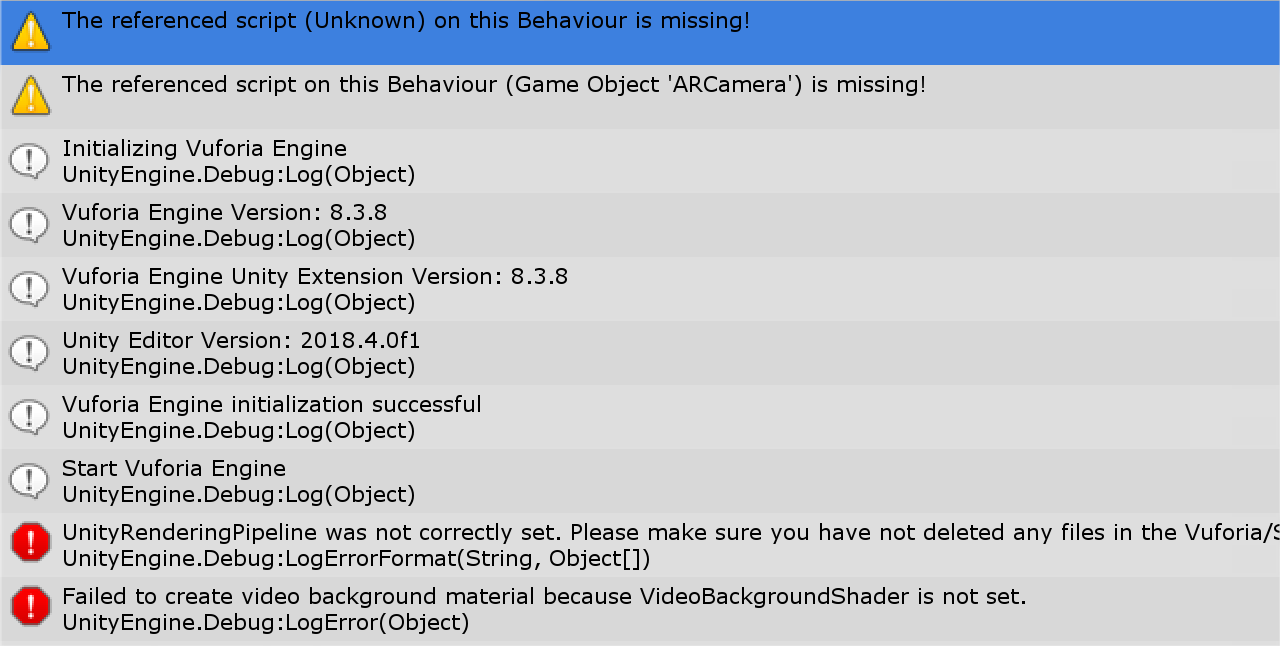
3.1.0 Unrelated errors in the console#
It is important to note that errors in the console related to C#, such as null reference exception, index array out of range, missing reference exception, etc, cause the code execution to stop.
If your application has reached one of those errors prior to any other errors, fix it first.
3.1.1 No Profile Entered#

If no profile is entered in the AppearitionGate, it will be unable to communicate with the EMS. It can be picked up by the error in the console as shown above.
3.1.2 Vuforia License Key not entered / mismatch#

This type of error is caused by no license key entered in the VuforiaConfiguration file. Additionally, it will happen whenever the ArCamera shows only a black screen.
To fix this, simply head over to https://developer.vuforia.com and fetch your Vuforia App License Key again and enter it inside the App License Key field on the VuforiaConfiguration file.
3.1.3 EMS Anonymous Token expired or mismatch#
This issue is most likely to occur upon getting the errors below:

Getting the experiences requires the lowest level of Token, but unlike Ping, still requires one. Failing this request means that you do have data entered in the AppearitionGate, but isn’t valid.
Head over to the AppearitionGate on the AppearitionManager_Ar object, and ensure all values are correctly entered.
3.1.4 Vuforia not finding a device#

This case occurs when the ArCamera’s VuforiaBehaviour script has its WorldCenterMode set to Device, and you aren’t running the program on a mobile device.
By default, we recommend having it set to First Target.

3.1.5 Vuforia not enabled#
If you have imported the ArDemo sample project but forgot to turn on Vuforia, the console might give you something like the following:
In order to fix it, head to the Player Settings and turn it on. Refer to 1.1 Setting the Unity Editor for more information.
3.2 – Target Not Found?#
3.2.1 – No Target Image attached#
While this case scenario shouldn’t be possible when creating an Experience from the EMS Portal, it can happen nonetheless when generating Data on the EMS from your application.
Ensure that your Experience has a Target Image before continuing further.
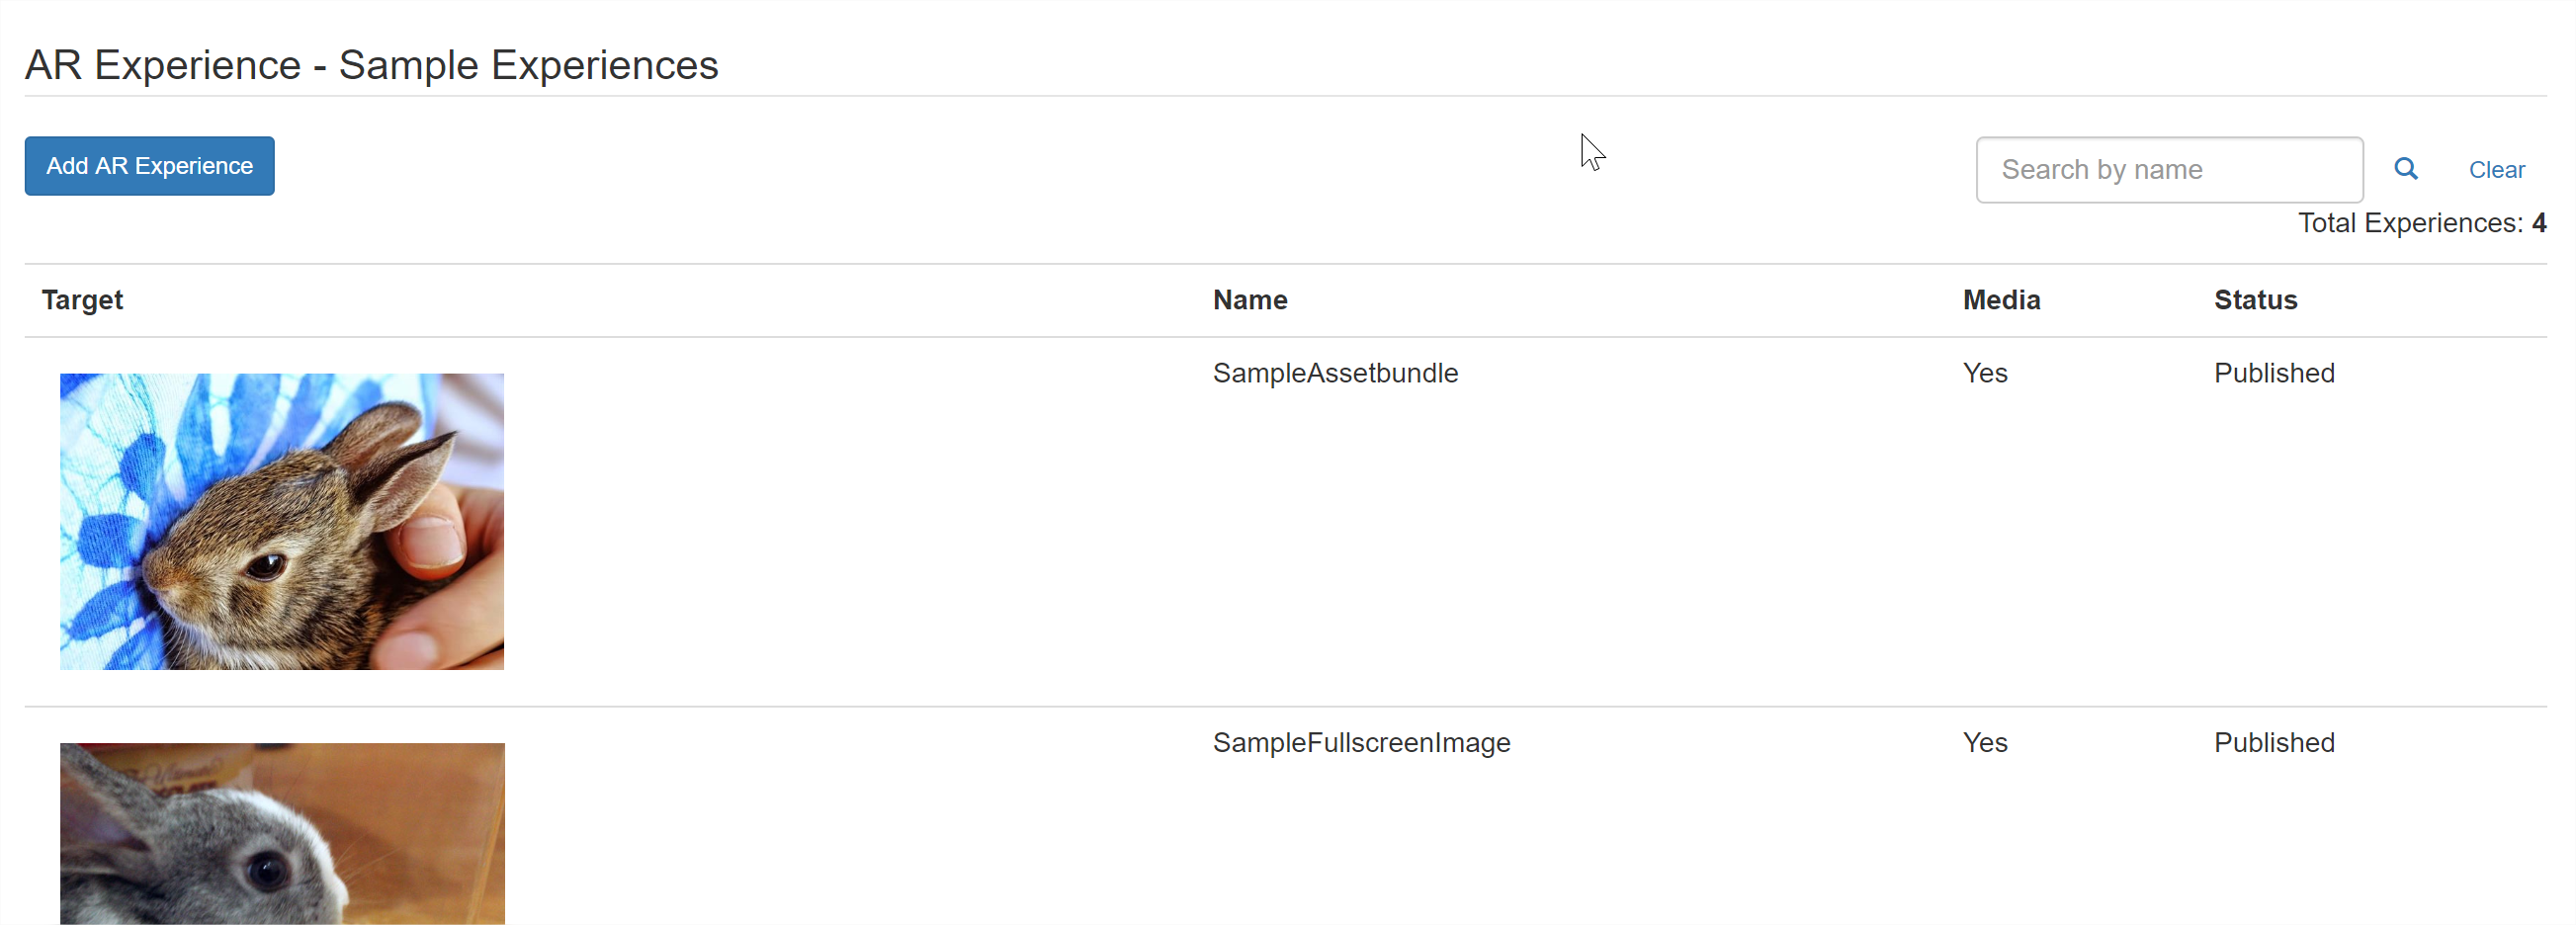
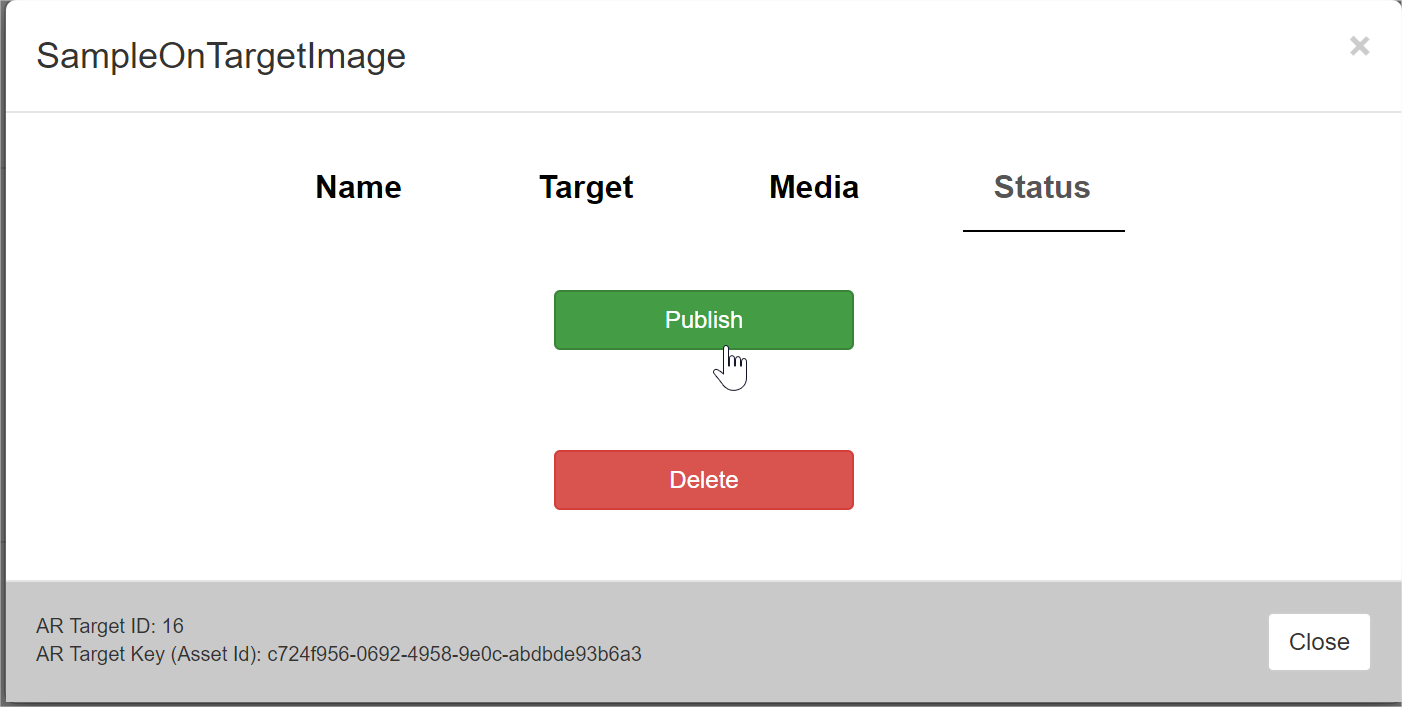
3.2.2 – Published or Unpublished#
Experiences have a published state which determine whether or not their data will be visible using the common API to fetch the Experiences data.
An unpublished Experience shows as greyed out in the Experience List, in the EMS, like so:

In order to fix it, click on the Experience, go to the Status tab, and click on Publish. Upon success, the Target Image preview will look normal.

3.2.3 – Image Recognition Syncing#
There is a chance that your Target Images are either not synced with your Image Recognition setup. Refer to 2.3 – First Run, Syncing with Vuforia Database to find more about how to sync Target Images with your Image Recognition on the EMS.
3.3 – Target found but where’s my Media?#
3.3.1 – No media attached#
While it may sound silly, this has happened to us quite a few times; whereby we have an Experience with a Target Image but forgot to add at least one Media.
As part of diagnosing for the lack of Media, checking the EMS is a must step. Refer to 2.2 – EMS Content Setup for more information about how to setup Medias.
3.3.2– Zero scale / Quad Rotation#
Nearly all non-fullscreen Medias will be using the Translation, Rotation and Scale values. If any of the Scale value is zero, the object will most likely not be displayed properly.
Additionally, depending on the type of Media, if it is rendered on a single-sided mesh (like, a quad) and X or Y rotations are greater than +90 or smaller than -90, it will not be displayed properly.
In order to change that, head over to the Experience, edit the Media, and set the Scale value properly. Refer to 2.2 – EMS Content Setup for more information about where to find those panels.
3.3.4 – Application not fetching Asset data#
Ensure that that the EMS Asset List is being fetched properly. In order to achieve that, ensure that the Logging Mode is set to Debug mode as shown in 3.0 – Debugging AR Experiences.
Having the Debug mode enabled, ensure that you get a similar log in the console:

These logs confirm that the experiences are fetched successfully. Prior to those logs, the EMS live data isn’t on the application yet, and so cannot be displayed when the Target has been found by the AR Provider.
3.4 – Contact Us#
If none of the issues are listed above, please contact us via mail at \<APPEARITION SUPPORT EMAIL>.
4.0 – Advanced MediaFile Usage#
At last, we will be talking about MediaFiles, what makes them, and what you can achieve with them.
4.1 – What’s a MediaTypes and MediaFile#
A MediaFile is the name of the storage container of a Media. It contains all the information each Media holds, including several optional fields.
One of the fields a MediaFile holds is a MediaType, which is a string representation of the type of Media in question. This type gets queried in order to display the appropriate type of Experience, such as an Image or a Video.
Each of those fields can be accessed in your application to provide better experiences.
4.2 – AssetBundles#
One of our favorite type of Media is the Assetbundle.
4.2.1 What’s an Assetbundle?#
An Assetbundle is a platform-specific compressed Unity package, mainly created for dynamic runtime data.
This kind of Media will let you import 3D models, animations, interactive experiences and more to your augmentations.
4.2.2 What are the restrictions to AssetBundles?#
In order for them to work, there are several rules to keep in mind. Some of those rules are enforced by Unity, and some are enforced by the nature of the default Assetbundle MediaType.
To begin with, the rules enforced by Unity are:
-
An Assetbundle will only be displayed properly on the platform it was built for. This means that Android devices should only receive AssetBundles compiled when the Unity platform is Android.
-
No new or additional scripts can be added on an Assetbundle. The Assetbundle can only use scripts that are already compiled into your current build with the same content.
-
Often, new shaders also cannot be displayed properly if they aren’t part of the compiled source code. Exceptions apply (fallbacks).
Finally, the rules enforced by the default Assetbundle MediaType are:
-
The Assetbundle should never contain more than one single prefab (the Assetbundle will hold the content of the prefab, such as materials, which is fine). That prefab will be instantiated.
-
For the sake of practicality, upload the AssetBundles for each platforms on the same Experience. The ArDemo will filter through and only download/display the relevant one.
Consider those points as a type of checklist to ensure everything will run smoothly.
An advice when using AssetBundles, in order to create the best Experiences, is to make great use of a highly modular structure and Unity editor tools, such as UnityEvents and the Animator.
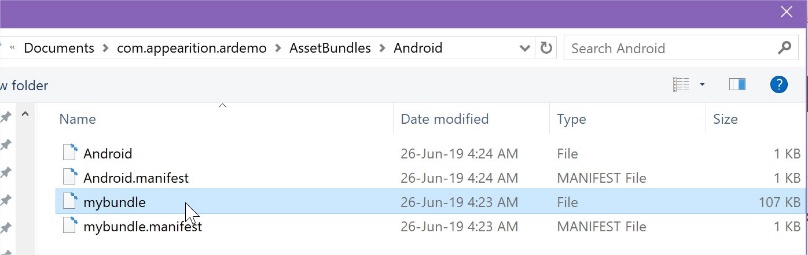
4.2.3 How to create an Assetbundle?#
Head over to the Unity Editor. The first step to creating an Assetbundle is to create a Prefab. We usually prefer having the root of the prefab without a mesh to have more control over the object structure, especially since the mesh GameObject requires transformations (like start rotation or scale).
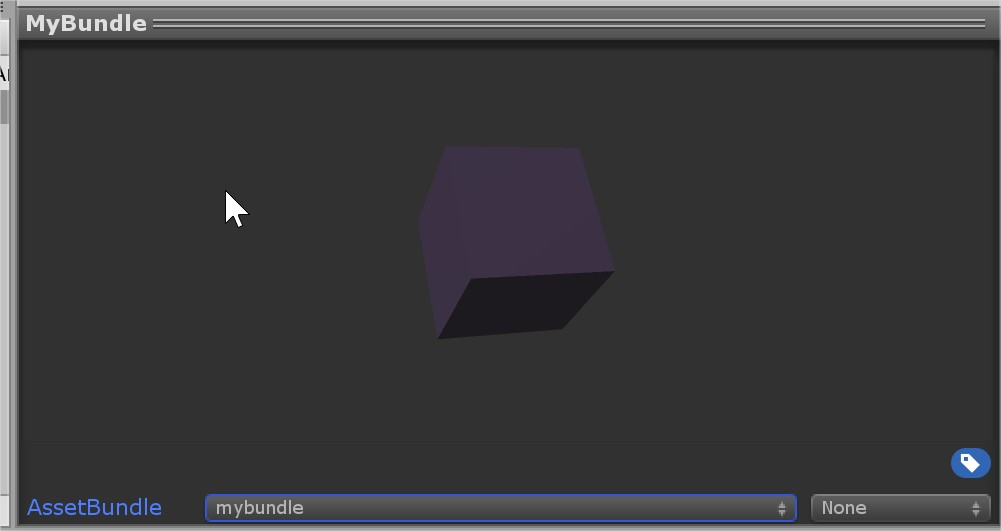
In this case, we’ll just be creating a simple Assetbundle with a Standard transparent shader on a cube, with no scripts attached.
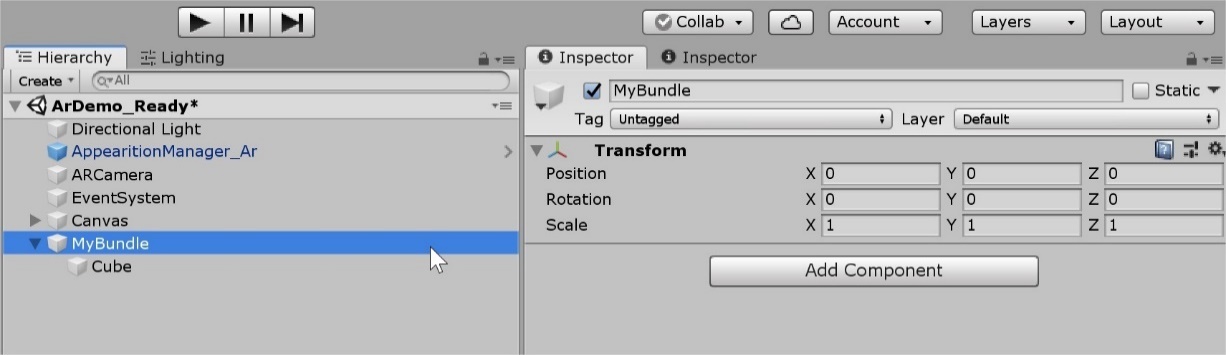
Once done, save the GameObject as a prefab by dragging it in the Project window. In the prefab preview, at the bottom, you will notice an AssetBundle field. Give it a handy name to get started.
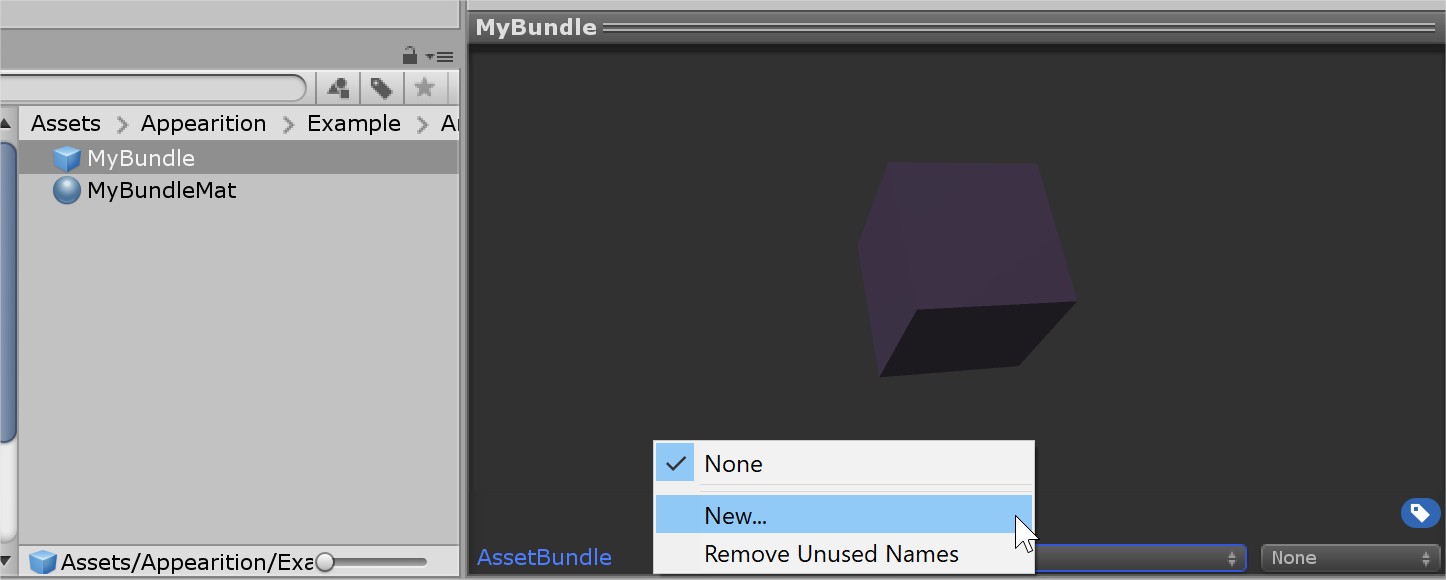
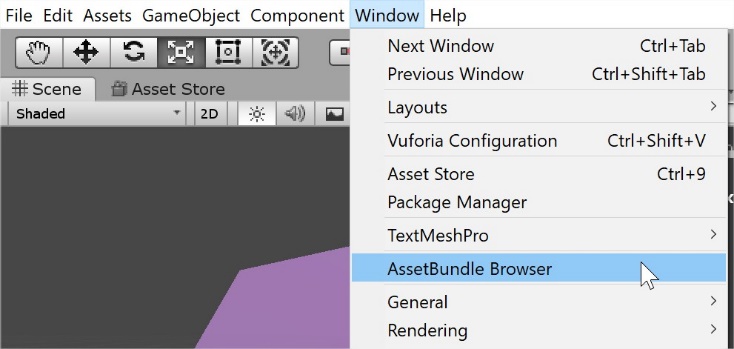
Now, onto building the Assetbundle. Head over to Window> AssetBundle Browser. This third party tool helps compiling those, with a lot of utilities related to seeing their content, and so on.
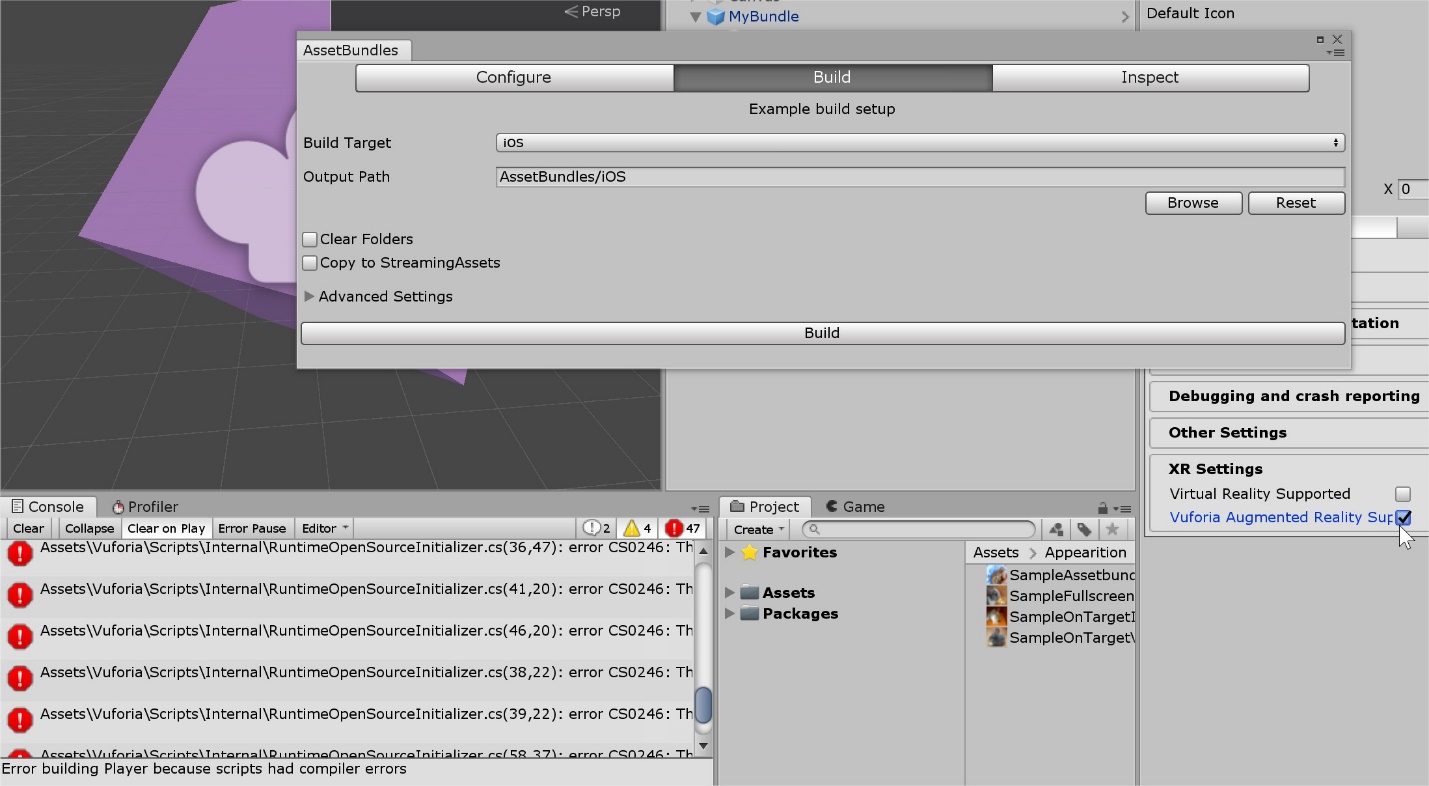
In the Configure Tab, you can see all the AssetBundles which will get compiled. Head to the Build tab, and press Build to compile.
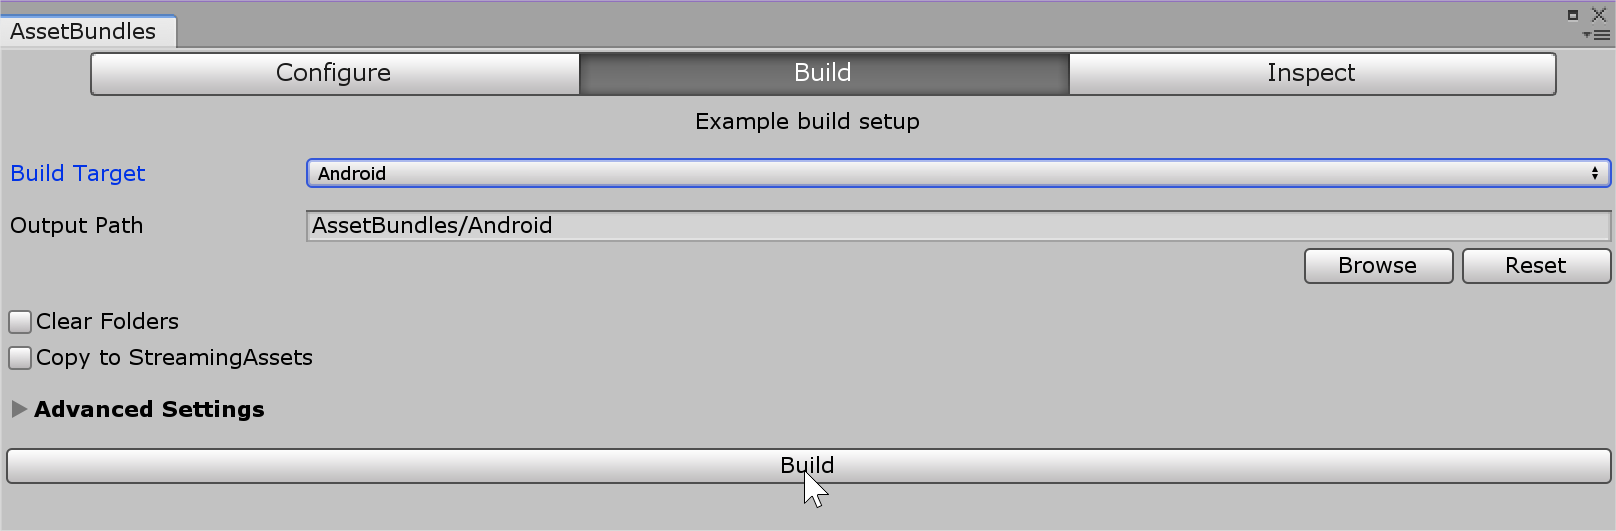
If you are trying to build on a target which isn’t your current target, this tool will make you switch to that target platform, then build for you.
Do note that if some settings aren’t enabled for that platform, especially Vuforia, it will give you some errors. This can be fixed by enabling Vuforia on the other platform as well.
Finally, head over to the EMS, and upload them as targets. If you are unsure how to upload a Media, head over to 2.2 – EMS Content Setup.
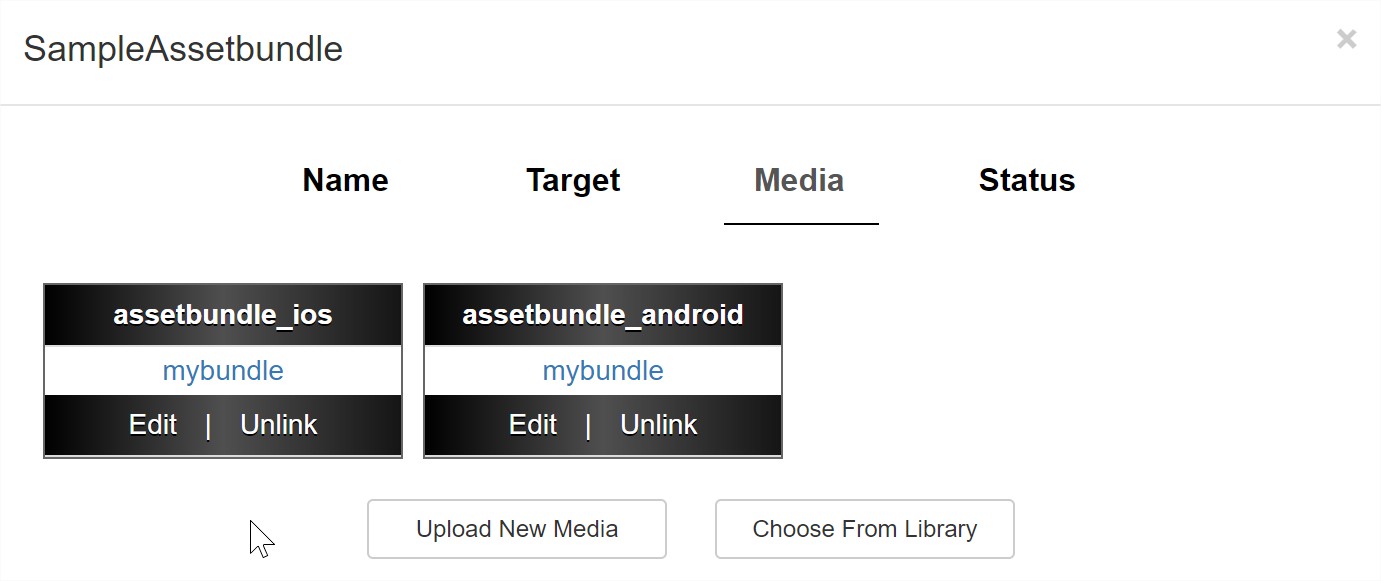
As said previously, we recommend placing the same AssetBundle of different platforms on the same Experience for the sake of simplicity. Do make sure that when creating those Medias, the current MediaType is used (Assetbundle_android vs Assetbundle_ios).

Once uploaded, you are all done and ready for testing.
4.3 – Extending the use of MediaFiles in the ArDemo#
By default, we are only using the basic MediaType, such as image, video and AssetBundles. The EMS supports many types of media (e.g. OBJ, Audio, scripting, etc) and can be configured to define custom types also (e.g. Transparent Video, complex button).
Please contact Appearition Support to enable more Media Types and the creation of Media Types for your account.
There are many parameters which can be changed in order to achieve the type of MediaType you desire. Do note that the EMS will only handle the requirements to upload, but the application needs logic so that it can understand and present those media types.
Once created, in the application, those MediaTypes will be referred by their names, like “image” and “text”. Do note that those names are case sensitive by default!
The way we are handling the implementation of MediaTypes in the ArDemo is by creating a new class which implements the IArMedia interface. The name of the class is MediaTypeArMedia. Do note that the first letter is uppercase in the class name, but not in the MediaType name.
Each ArMedia should cover a few functionalities: Ability to be displayed, hidden, and setup using the MediaFile data (the information entered in the EMS).
There are two ways to have a MediaType to be picked up in the EMS:
-
A Prefab will be found under Resources>ArPrefabs with the exact name of the MediaType. This prefab should contain a class which implements IArMedia at the root.
-
A class will be found with the name MediaTypeArMedia.
The AppearitionExperience class is in charge of creating the Media objects using the MediaType and MediaFile information.
Thank you!#
Thank you very much, have a wonderful day and happy deving!